Every one of our roofing material pages points back to this one, and there is a reason. In a Minnesota winter, the attic under the roof matters more than the roof on top of it. The most expensive shingle in the world will still let ice dams form and ceilings stain if the attic below it is leaky, under-insulated, or poorly ventilated. This page explains how attic ventilation and insulation actually work, how to spot the warning signs, and what a board should do about them.
This page explains concepts and points to authorities. Treat what follows as the questions to raise, and confirm specifics for your buildings with your local building official and a qualified professional.
The one idea that ties it together: keep the roof cold
A roof in winter is supposed to stay cold and stay the same temperature from ridge (the peak) to eave (the bottom edge). When the whole roof surface is uniformly cold, snow sits on it and melts slowly and evenly, and water runs off. Problems start when part of the roof gets warm. Warm spots melt snow from underneath, and that meltwater refreezes when it reaches the still-cold edge. That is the root of nearly every winter roof problem in Minnesota, and it is controlled from inside the attic, not from the shingles.
Three things keep the roof cold: air sealing (stopping warm indoor air from leaking up into the attic), insulation (slowing heat from passing through the ceiling), and ventilation (flushing the attic with outside air so it stays near the outdoor temperature). They work as a system, in that order.
How attic ventilation works
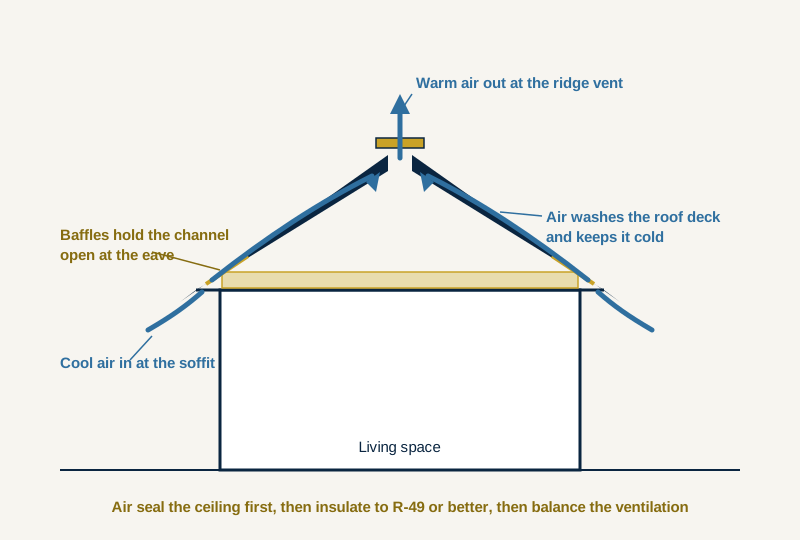
A properly vented attic pulls cool outside air in low and pushes warm air out high, washing the underside of the roof deck with outdoor air so it stays cold.
- Intake comes in low, at the soffit. The soffit is the finished underside of the roof overhang. Vents there let outside air enter at the eaves.
- Exhaust goes out high, at the ridge. A ridge vent runs along the peak and lets the warmed air escape, which pulls more fresh air in behind it.
- The system has to be balanced. Intake low and exhaust high, roughly matched, so air actually moves. Mixing vent types that fight each other (for example, adding a ridge vent but also leaving open gable vents) can short-circuit the airflow so the attic pulls air from the wrong place and ventilates poorly.
The code target. The 2020 Minnesota Residential Code (Section R806) calls for a minimum of 1 square foot of net free vent area for every 150 square feet of attic space. That can be reduced to 1 per 300 when the ventilation is balanced between low intake and high exhaust, or when a vapor retarder is used on the warm side of the ceiling. Confirm the exact requirement for your buildings with your building official.
One more, often missed: bathroom and kitchen exhaust fans must vent all the way to the outdoors, never into the attic. Dumping warm, moist air into the attic is a fast track to frost, mold, and a warm roof deck.
How insulation works, and why air sealing comes first
Insulation is rated by R-value, a measure of how well a material resists heat flow. Higher R-value means better resistance. For a Minnesota attic, the U.S. Department of Energy and ENERGY STAR recommend R-49 to R-60 (Minnesota sits in climate zones 6 and 7, the cold end of the map). The 2021 energy code baseline for these zones is R-60 for new and major retrofit work.
R-value alone does not stop ice dams, and this is the part boards most often get wrong. Air sealing has to come first. Insulation slows heat moving through solid material, but it does not stop air from leaking through gaps. The Department of Energy finds air leakage can account for 30 to 40 percent of a home's heat loss. You could have a foot of insulation and still get a warm roof if indoor air is streaming up through dozens of small openings around recessed lights, plumbing stacks, wiring, the attic hatch, chimneys, and the joints where walls meet the attic floor. Those openings are called attic bypasses, and sealing them (with caulk or spray foam) is the highest-value step. The correct sequence is air seal, then insulate to R-49 or better, then confirm the ventilation is balanced.
Two details that protect the work: keep insulation from burying the soffit vents by using baffles (rigid channels that hold an air gap open at the eave), and remember that heat loss often starts lower in the building and rises, so a complete fix looks at the whole thermal envelope, not just the attic floor.
Ice dams: the Minnesota headline
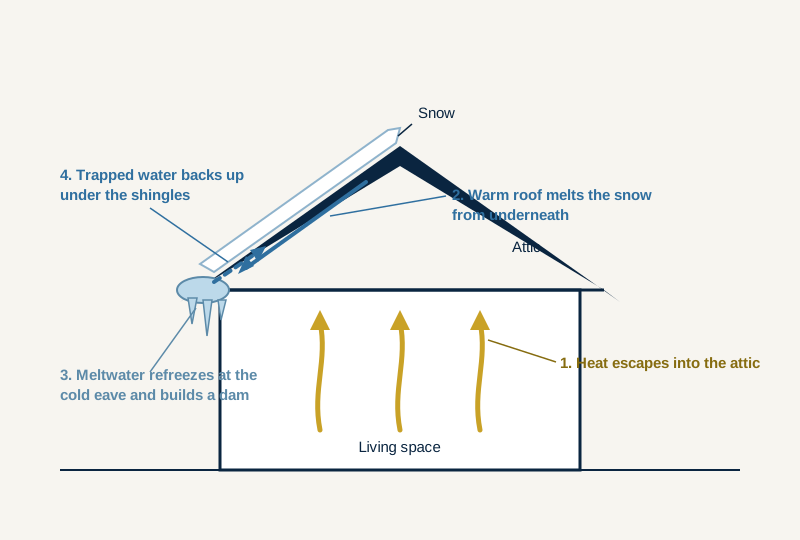
An ice dam is a ridge of ice that forms at the cold edge of a roof and blocks meltwater from draining. The trapped water then backs up under the shingles and leaks into the ceilings and walls below. Per University of Minnesota Extension, three ingredients have to line up: snow on the roof, a warm or leaky attic, and freezing outdoor temperatures. It can happen with as little as two inches of snow.
The main point for a board: an ice dam is an attic problem, not a roof-surface problem. It is caused by heat escaping into the attic and warming the roof deck. That is why swapping to a different or more expensive roofing material does not, by itself, fix ice dams, and why a brand-new roof can still get them if the attic underneath was never addressed. Metal sheds snow faster, which helps a little, but the real fix is always inside the attic: seal the air leaks, bring the insulation up to R-49 or better, and balance the ventilation.
Snow raking and roof heat cables are temporary band-aids, not solutions. They can relieve a roof in an active storm, but they do not stop the next dam from forming, and both carry their own risks. The permanent fix is the air-seal-insulate-ventilate sequence above. (Our Ice Dams page covers recognition and removal in detail.)
How to recognize attic and ventilation problems
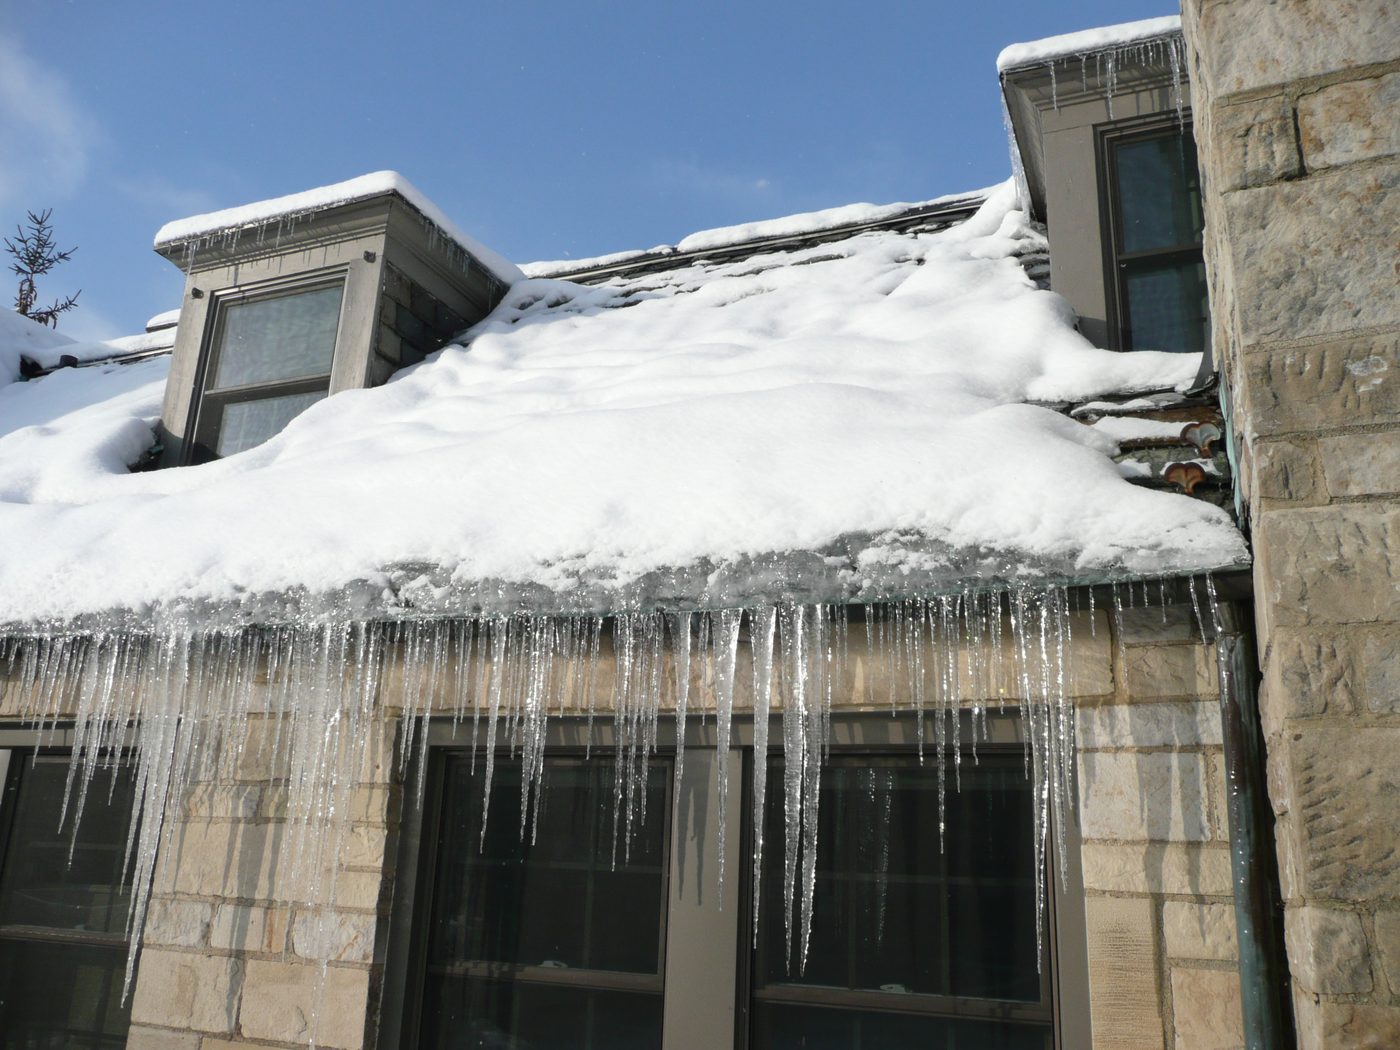
You can catch most of these from the ground or with a careful attic look on a cold day:
- Icicles and ice ridges at the eaves and gutters after snow. The classic ice dam sign.
- Uneven snow melt on the roof, bare warm streaks next to snow-covered areas, which points to heat leaking through in spots.
- Water stains on top-floor ceilings or walls, especially after a thaw following heavy snow.
- Frost or moisture on the underside of the roof deck, or a musty smell in the attic, which signals warm moist air getting up there.
- Rusty or frosted nail tips poking through the deck in the attic, a telltale of attic condensation.
- Thin, matted, or unevenly spread insulation, or being able to see the ceiling joists (if you can see the joists, there is not enough).
- Higher-than-expected heating bills on the top-floor units.
If you find active leaking or water damage, document it with photos and dates and bring in a qualified professional. (This page is about recognizing and preventing the problem. If the damage turns out to be storm related, see Wind and Storm Damage Recognition.)
What it means for your association
Shared attics change the picture. In townhomes and many condominiums, attic spaces and the ceiling plane can run across unit lines, and one unit's leaky bypasses can warm a roof section over a neighbor. That makes attic performance an association-level building question, not a single owner's chore, and it is worth clarifying in your documents who owns the attic, the insulation, and the fix.
Fix the attic during a re-roof, not after. A roof replacement is the best and cheapest moment to correct ventilation and add an ice barrier, because the roof is open and accessible. A board planning a re-roof should have the attic ventilation and insulation evaluated as part of the same project rather than paying twice.
Switching roofing materials? The attic is what makes it work.
Changing the covering (asphalt to metal, or to composite, slate, or shake) changes the underlayment and how water sheds at the eaves, but it does not change the physics inside the attic. If ice dams or condensation are a problem now, a new surface alone will not solve them. Address the air sealing, insulation, and ventilation as part of any material change. Our four roofing material pages (Asphalt Shingles, Metal Roofing Types, Composite and Synthetic Roofing, and Natural Slate and Wood Shake) each note this.
Budget and next move. In Minnesota, a combined attic air-sealing and insulation project commonly runs somewhere between $1,000 and $4,500 depending on size and access, and it usually pays back through lower heating bills and avoided water damage. A good first step is an advanced energy assessment, which uses infrared cameras and a blower door to find the exact leaks before anyone spends on insulation. Many utilities offer rebates for this work, so it is worth checking with your provider.
Sources
- University of Minnesota Extension, ice dams (formation and prevention): extension.umn.edu (Opens in a new tab)
- U.S. Department of Energy, air sealing and insulation: energy.gov/energysaver/weatherize (Opens in a new tab)
- ENERGY STAR, recommended home insulation R-values: energystar.gov (Opens in a new tab)
- Minnesota Department of Commerce, Home Energy Guide: mn.gov/commerce (Opens in a new tab)
- Center for Energy and Environment (Minnesota), dealing with ice dams: mncee.org (Opens in a new tab)
- 2020 Minnesota Residential Code, Section R806 (roof ventilation) and Chapter 9 (Roof Assemblies), via ICC: codes.iccsafe.org (Opens in a new tab)
- Minnesota Department of Labor and Industry, residential code: dli.mn.gov (Opens in a new tab)
Next step
Seeing icicles, ceiling stains, or uneven snow melt on your buildings? Download the Attic and Ice Dam Self-Check to walk your board through the warning signs and the air-seal-insulate-ventilate fix in order, or send your specifics through the question form and we will point you to the right resources.