Pull back the shingles at the edge of almost any roof and you find a layer most people never see. Do the same behind a piece of siding and you find another one. On most buildings, the layer doing the actual waterproofing is not the shingle and not the siding. It is the membrane underneath. Boards approve roofs and siding by the color and the brand on the wrapper, and the part that actually keeps water out of the wood barely gets a line in the bid.
This page walks through the layers under your roofing and siding, why some of them need to breathe, and why the window details tie the whole system together.
"Ice and water shield" is a brand, not a product type
"Ice and water shield" is a trademark. The original product is Grace Ice & Water Shield, invented by W.R. Grace and now sold by GCP Applied Technologies, which introduced fully-adhered roofing underlayment more than thirty-five years ago. The generic product type is a self-adhered leak barrier, sometimes called an ice barrier membrane: a peel-and-stick sheet of rubberized asphalt that bonds to the roof deck and seals around the nails driven through it. Other manufacturers make the same category under their own names (GAF calls its version WeatherWatch, for example). (Yes, the brand became the product name, the same way people say Kleenex for a tissue.)
This matters on a bid. When a proposal says "ice and water shield," ask which product, where it is going, and how much of the roof it covers. Those are three different decisions, and they change the price and the performance.
The three kinds of roof underlayment
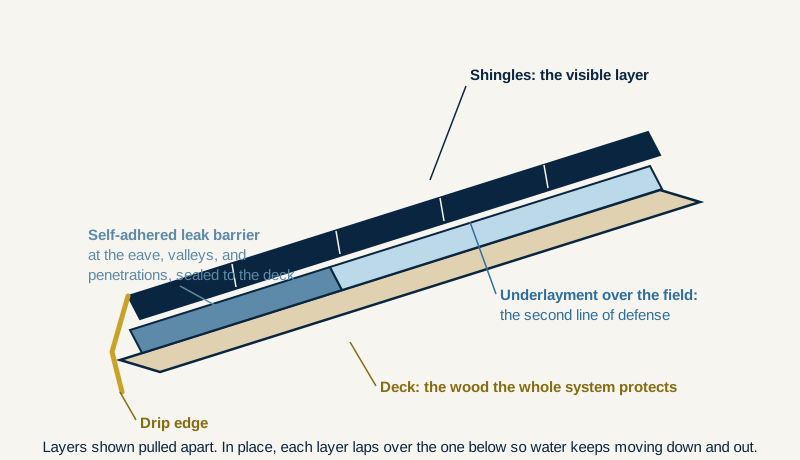
Under the shingles sits the underlayment, the roof's second line of defense when water gets past the shingles or during the days the deck is open. There are three families.
- Asphalt-saturated felt (felt, or tar paper). The traditional choice, sold as #15 and #30. It is inexpensive and it breathes reasonably well, which lets a damp deck dry. It is also heavier, tears in the wind, and typically lasts twelve to twenty years.
- Synthetic underlayment. Woven polypropylene or polyethylene. Lighter, stronger, safer to walk, and rated for longer sun exposure during construction. Most standard synthetics are close to vapor-impermeable, meaning they slow drying to the outside. That is a strength when you want a barrier and a weakness when the deck needs to dry.
- Self-adhered leak barrier (the peel-and-stick category above). Fully waterproof and self-sealing around fasteners. It is the premium layer for the spots that flood: eaves where ice dams back water up, valleys where two planes drain into one, low-slope sections, and around chimneys, skylights, and pipes.
Breathability is the part everyone misses
Every one of these layers has a permeance rating, measured in "perms." A high number lets water vapor pass and lets wood dry. A low number holds vapor back. Felt runs on the permeable side. Many synthetics sit near zero, which makes them a vapor barrier in practice.
Here is the trap. Homes have gotten tighter and better insulated, and moisture from inside (cooking, showers, breathing) rises into the assembly. Seal the outside of the deck with a vapor-impermeable layer and, unless the assembly is ventilated, that moisture has nowhere to go. It stays in the sheathing. The National Roofing Contractors Association has made the same point in its own publication: self-adhering underlayments are built to protect vulnerable areas and may not be appropriate for covering an entire roof, and many synthetic-underlayment manufacturers forbid their products on unvented roof assemblies for exactly this reason.
Trapped air and moisture do two things over time. They run the shingles hotter and speed their wear, and they degrade attic performance and the wood itself. This is why airtight houses now need mechanical air exchangers, and it is why a whole-deck wrap of impermeable membrane is a design decision, not a default. More is not automatically better. A building breathes, and the underlayment plan has to account for how this one is going to dry.
The change shows up hard when a roof moves from wood shakes to asphalt shingles. Cedar shakes over spaced (skip) sheathing breathe on all sides. Swap to shingles on a solid deck with a near-airtight synthetic under them and you have changed the drying regime of the whole roof. That call has to be made in ADVANCE, before the deck is closed up, not discovered later.
There are answers when the assembly needs to breathe. Vapor-permeable self-adhered underlayments exist (Benjamin Obdyke's VaporDry SA is one), and fluted or mesh drainage layers create a vented air space above the deck or behind vertical cladding (Cedar Breather and rainscreen mats are examples). These channel air and moisture out. But they only work if they are specified up front, because they are underneath everything else.
Walls: the housewrap is the water barrier, not the siding
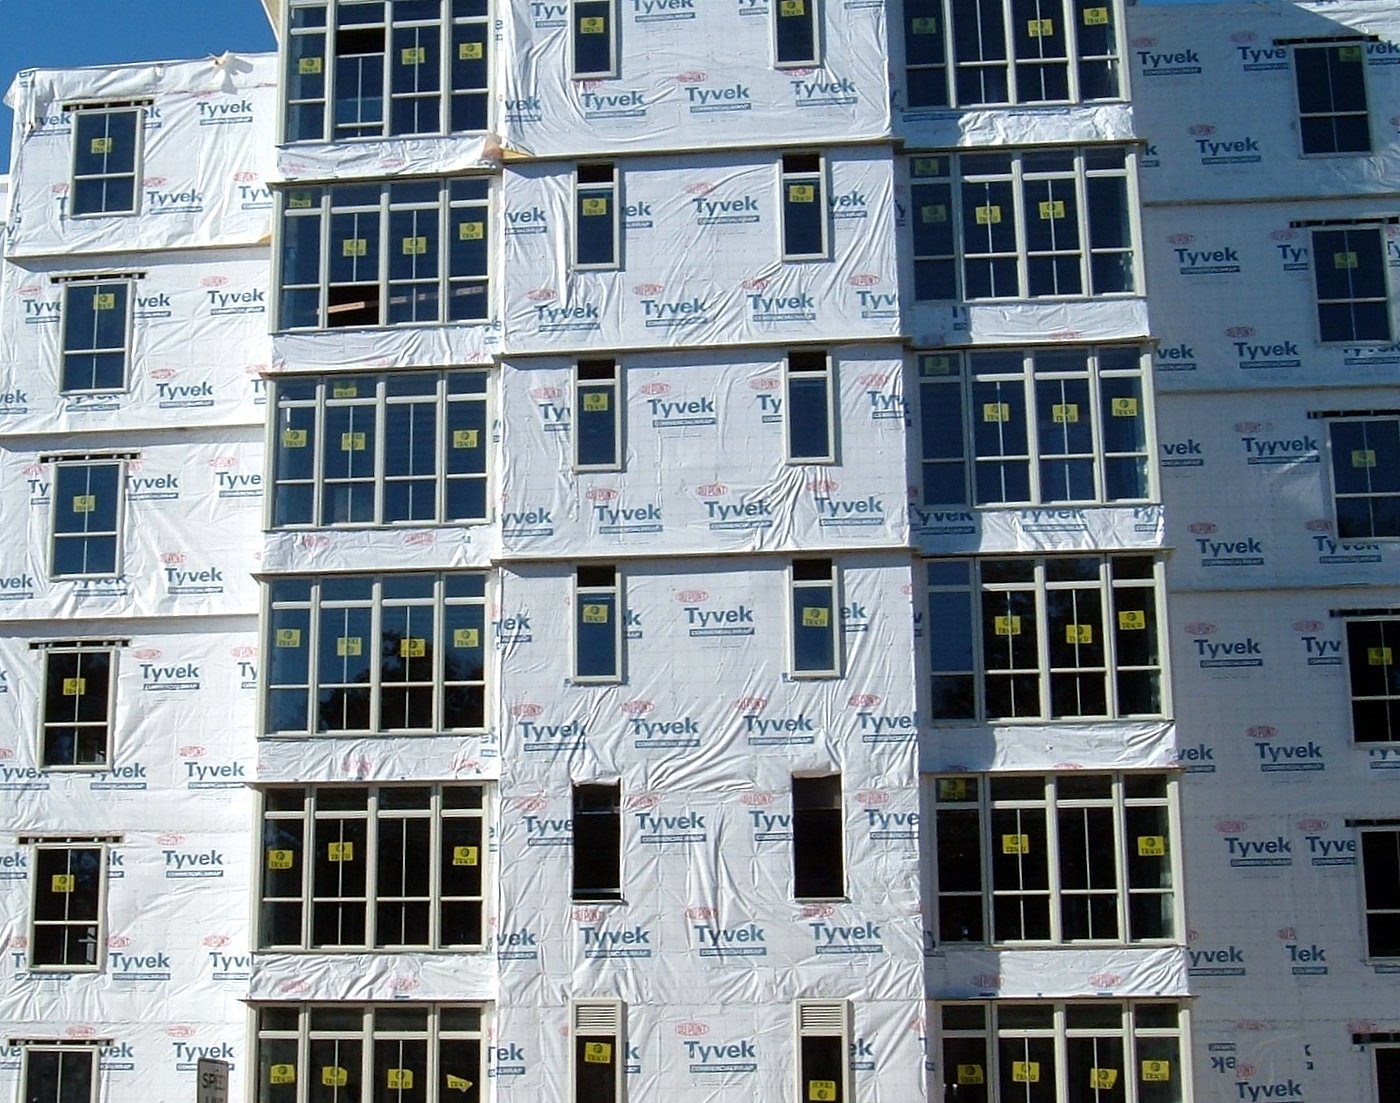
Behind the siding is the weather-resistive barrier, the WRB, usually a housewrap. Assume the siding is not truly waterproof: wind-driven rain gets behind vinyl, wood, fiber cement, stucco, and brick veneer alike. The WRB is the drainage plane that catches that water and sends it back out. It is the layer keeping the sheathing dry, not the siding.
"Tyvek" became a stand-in for "housewrap" the same way "ice and water shield" did, because it was the first synthetic wrap on the American market. Most WRBs are deliberately vapor-permeable so the wall can dry (Tyvek HomeWrap is rated around 56 perms). A WRB is not a vapor barrier, and installing an actual vapor barrier like poly sheet under the siding is how walls rot.
Two more points a board should know. A wrap only drains if there is a gap behind the siding: drainable wraps with built-in grooves or spacers (DuPont Tyvek DrainWrap, Benjamin Obdyke HydroGap) and rainscreen mats create that space. And no wrap works if the seams and the openings are not integrated correctly, which brings us to the windows.
Windows have to be taped and tied in
A window is a hole cut through the wall's water barrier. The waterproofing works only if the window is flashed and taped back into the WRB in the right order. The sequence is shingle-style, each upper layer lapping over the one below so water always runs down and out:
- A sloped sill pan under the window first, with end dams, extending past the opening on both sides. (The International Residential Code and International Building Code both require sill-pan flashing at window and door openings.)
- Self-adhered flashing tape up the jambs, lapping over the sill pan's end dams.
- Head flashing over the top, with the WRB above lapped over it, never tucked behind.
- The bottom left open to drain. Sealant on the top and sides, not across the bottom weep path.
Two field notes we see constantly. Insert (pocket) replacements drop a new window inside the old frame and finishes. They are fast, but they leave the original frame in place and hide whatever water damage is already there, and they do not let you rebuild the flashing from the sill up. Full-frame replacement takes it back to the studs so the pan and flashing can be done right. For that reason, inserts are not recommended where water management is the concern. And reusing twenty-year-old flashing tape under a new window means the weakest link in the whole wall is two decades old on day one. Caulk is not flashing. Sealants dry out and fail in ten to fifteen years, and a poorly taped window or penetration sends water down the watershed inside the wall, where the repair costs many times what the tape would have.
So what does this mean for your association?
The underlayment, the housewrap, and the window integration are decided before the roofing or siding goes on, and they are effectively permanent once covered. You cannot inspect or fix them from the outside later without opening the assembly back up. That puts them squarely in the project scope, not in the field decisions a crew makes on the fly.
Practical steps for a board or manager planning a roof or exterior project:
- Ask each bidder what underlayment goes where, and whether the assembly is vented or needs a breathable layer.
- Ask whether whole-deck leak barrier is being proposed, and why, for your specific roof.
- On siding, ask what WRB is specified and whether there is a drainage gap or rainscreen behind the cladding.
- On windows, ask for full-frame with new sill pans and flashing, integrated into the WRB, not inserts sealed with caulk.
- Match breathability to the assembly. A roof moving from shakes to shingles, or a wall getting tightened up, is the moment to get this right.
How to evaluate these choices (our methodology)
We compare products on published manufacturer specifications and code references, not on brand loyalty: permeance ratings (perms), exposure and service-life ratings, drainage efficiency, and compatibility with the rest of the assembly, checked against the current International Residential Code and the manufacturer's own installation instructions. We rank material categories and national product lines, never local firms. This page was last reviewed in July 2026 and is refreshed when a product line or code reference changes.
Sources and further reading
- GCP Applied Technologies, Grace Ice & Water Shield product data: gcpat.com (Opens in a new tab)
- Atlas Roofing, understanding felt and synthetic underlayment: atlasroofing.com (Opens in a new tab)
- National Roofing Contractors Association, Professional Roofing, on impermeable underlayments and trapped moisture: professionalroofing.net (Opens in a new tab)
- Benjamin Obdyke, pros and cons of roof underlayments (breathable options): benjaminobdyke.com (Opens in a new tab)
- DuPont Tyvek HomeWrap (WRB permeance and drainage): dupont.com (Opens in a new tab)
- Fine Homebuilding, nine water-resistive barriers worth knowing about: finehomebuilding.com (Opens in a new tab)
- GreenBuildingAdvisor, a fresh look at water-resistive barriers: greenbuildingadvisor.com (Opens in a new tab)
- University of Minnesota Extension is a strong Minnesota-specific resource for attic ventilation and ice dams. See also our companion page, Ice Dams.
A note on scope
TruPoint is an advisor, not the building official or a licensed engineer. This page explains concepts so a board can ask better questions and write a better scope. Verify code specifics with your local building official and confirm product details against the manufacturer's current installation instructions.
Next step
If your association is planning a roof or exterior project, request a pre-scope review of the underlayment and window-integration details before the bids go out. We will note, in plain language your board can vote on, what to specify and what to ask each bidder, so the layer that does the real waterproofing gets decided on purpose. You can also download the Weather Barrier and Flashing Checklist for your next walk-through.