A Minnesota storm rolls through overnight, and the next morning a board member is standing in the parking lot looking up at the buildings, phone in hand, not sure what counts and what does not. A few shingles are in the grass. One roofline looks a little ragged. Is that new, or was it always like that? This page is built for that moment. It walks through what wind and hail actually do to the common roof and exterior materials on association property, how to tell fresh storm damage from ordinary age, and what a board should write down while the memory is clear.
What this page does, and how we work
This page helps your board recognize storm damage and document what you see. Beyond the page, TruPoint works for the association. We document condition, we coordinate with your carrier on the board's behalf, and we help the board understand the process it is walking into.
Where a claim, a coverage dispute, or a structural question calls for a licensed professional, we help the board bring in the right one.
We are advisors, not code officials or engineers. Where a question turns on structural safety or code compliance, that goes to a licensed engineer or your building official, not to a roofing opinion.
Where storm damage tends to show up first
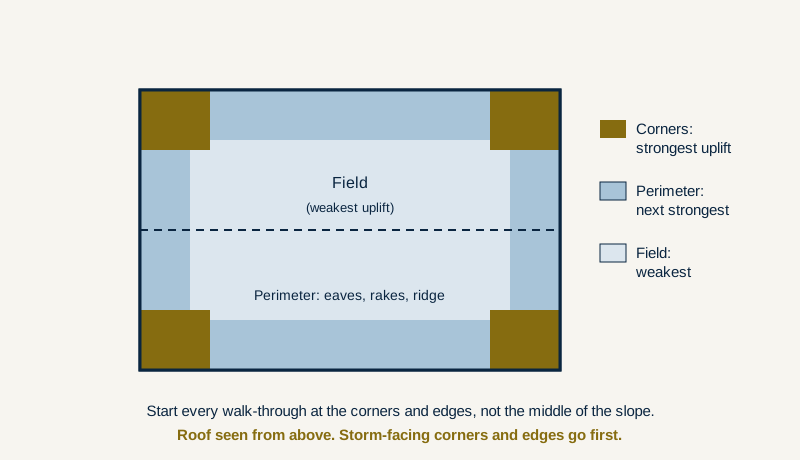
Wind does not hit a roof evenly. Research from the Insurance Institute for Business and Home Safety (IBHS) and post-storm assessments from FEMA point to the same pattern: uplift force is strongest at the corners of a roof, next along the perimeter (the eaves, the rake edges, the ridge), and weakest in the field, the broad middle of each slope. That is why the first shingles to lift, crease, or blow off are usually near a corner or an edge, not in the center of a slope where most people look.
Knowing this helps two ways. It tells your walk-through where to concentrate, and it helps separate real storm damage (concentrated at edges and corners, on the storm-facing sides of the buildings) from scattered wear that shows up evenly across an old roof.
What wind damage looks like
On steep-slope shingle roofs
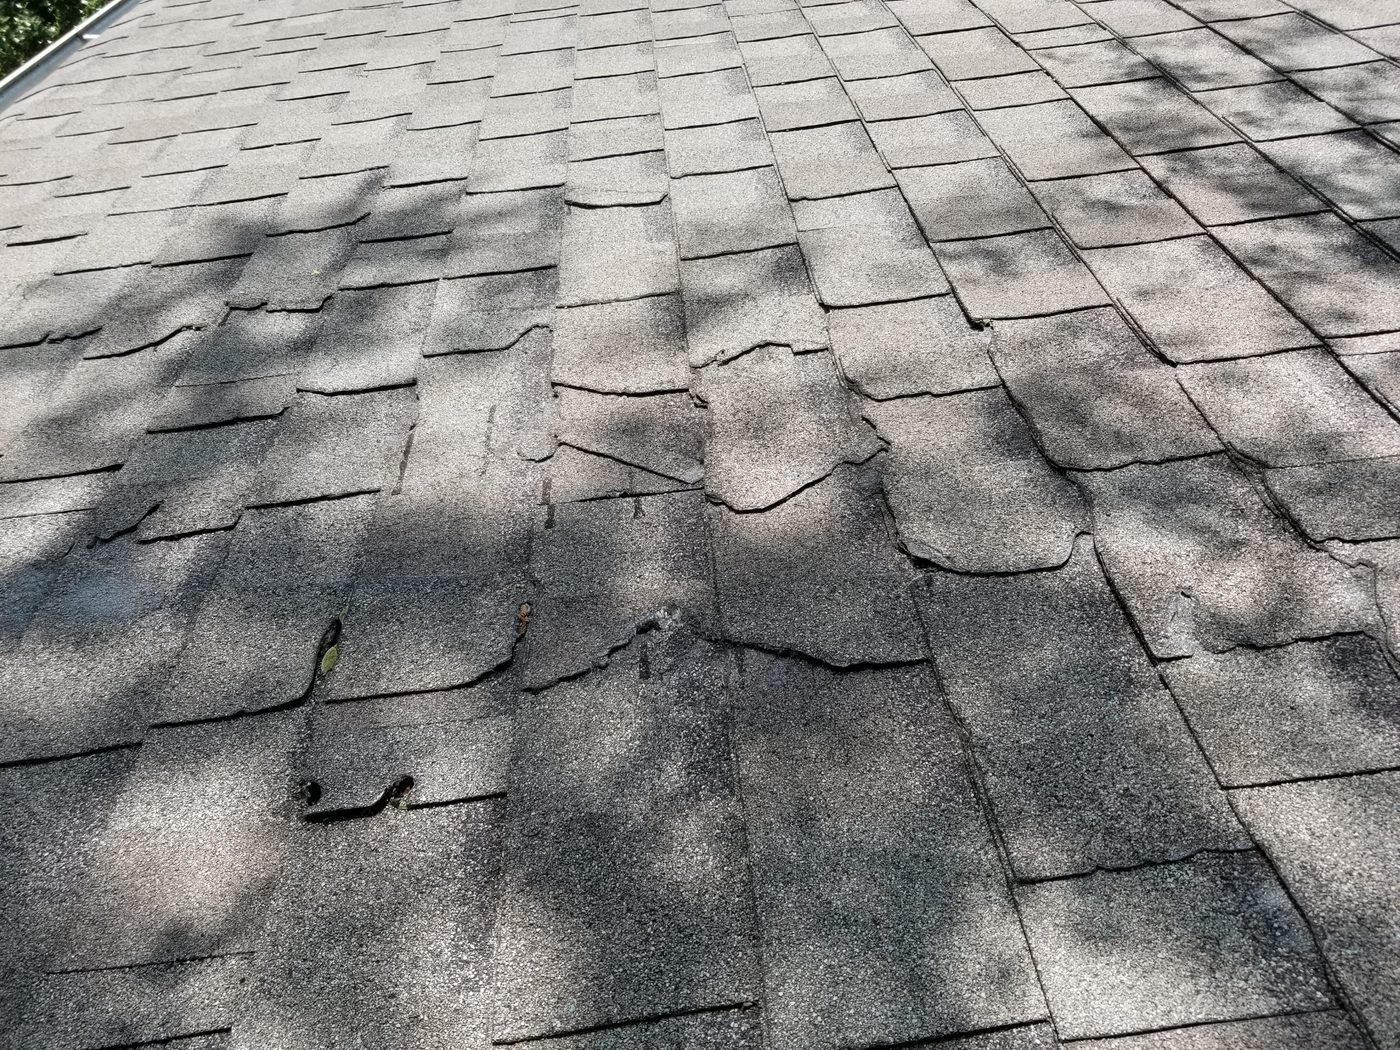
- Creased tabs. A crease is a hard fold line across a shingle where wind lifted it and bent it back. It stays visible even after the shingle settles flat again. Industry research treats creasing, tearing, or a shingle detaching as the signs that confirm true wind damage.
- Lifted or unsealed shingles. Wind can break the factory seal that bonds one shingle course to the next. A word of caution here: a shingle that is unsealed but shows no crease or tear is not automatically wind damage. Shingles can fail to seal for reasons unrelated to a storm, including age and how they were installed. This is exactly the kind of judgment call that belongs to a qualified inspector, not a guess from the ground.
- Missing shingles. Full tabs or whole shingles gone, often with the ones downwind of them in the landscaping. Missing shingles expose the mat or the deck underneath and are an immediate water path.
- Exposed or backed-out fasteners. Nail heads showing, or shingles that have shifted enough to reveal the nail line.
- Granules in the gutters. Granules are the sand-like mineral coating on asphalt shingles. A sudden pile of them in gutters and at downspout outlets after a wind event is worth noting (some granule loss is normal over a roof's life, a fresh heavy deposit is not).
- Loose, bent, or displaced flashing. Flashing is the metal that seals the joints where a roof meets a wall, a chimney, a valley, or a vent. Wind can peel it back or lift its edges.
- Damaged ridge caps. The capping shingles along the peak sit in the highest-uplift zone and often go first.
On low-slope and flat roofs (breezeways, garages, mid-rise buildings)
Many associations have flat or low-slope sections covered by a single-ply membrane, a large rubber-like sheet such as TPO or EPDM, or by modified bitumen (an asphalt-based sheet good). Wind works on these like someone peeling a sticker off glass. Once an edge lifts, the roof can "unzip" quickly. Look for:
- Lifted membrane edges and curling or opened seams.
- New wrinkles, bubbles, or billowing areas that were not there before (fully-adhered systems tend to ripple, mechanically-attached systems tend to shift and flutter).
- Loose or missing edge metal along the perimeter.
- On ballasted roofs (the ones covered in loose gravel), displaced ballast and bare membrane showing through.
- Punctures or scrapes where wind dragged debris across the surface.
Damage here concentrates at corners, along the perimeter, and around rooftop units. One important quirk of flat roofs: water travels sideways under the membrane, so the leak that shows up on a ceiling inside may be several feet from where the membrane was actually breached.
On the rest of the building envelope
Wind also shows itself in fascia and soffit that have pulled loose, gutters and downspouts that are dented or detached (see the Gutters and Drainage page), bent roof vents, damaged fence sections, and siding that is cracked, loose, or missing. These are often easier to photograph from the ground than the roof itself, and they help establish that a real wind event hit the property.
What hail damage looks like, by material
Hail leaves different fingerprints on different materials, so the first question is always what the roof is made of. Here is what to look for on each.
Asphalt shingles
Hail leaves three marks on asphalt: granule loss in rough circles, bruising where the stone fractured the fiberglass mat underneath, and outright cracking from larger stones. The bruise is the one that gets missed, because it can look nearly intact from twenty feet away and only reveals itself as a soft spot under firm pressure.
In Minnesota, roughly one-inch hail (about quarter size) is the common threshold for taking asphalt damage seriously. Much of what falls here runs quarter to golf-ball size.
Asphalt takes hail differently than the harder materials that follow, and the signs are specific enough to be worth their own walkthrough. See Hail Damage on Asphalt Shingles for the test-square method, the fresh-versus-aged comparison, and the judgment calls that trip up most ground-level inspections.
Metal roofing
On metal, the failure mode is usually cosmetic. Hail dents the panels, but because the panels sit tight against the roof deck they mostly keep shedding water even when dented. Softer metals (aluminum and copper) dent more easily than steel. The place to watch is the details: a functional problem on metal usually starts where hail strikes a seam, a ridge or hip cap, or a piece of trim or flashing, which can open a path for water. A useful side benefit of metal and other painted surfaces is spatter marks, spots where hail knocked off oxidation, dirt, or a thin paint film. Spatter helps confirm the direction the storm came from and that hail actually fell.
Composite and synthetic roofing
Synthetic slate and shake products are engineered to flex on impact, so they often take a hail hit as a surface mark without cracking through. Very large stones can still crack them, and each product line has its own tested impact behavior, so recognition here means checking the specific product against the manufacturer's guidance (see the Composite and Synthetic Roofing page).
Natural slate
Slate is hard but brittle. Hail damage shows as cracked or punctured tiles, often with a star-shaped fracture radiating out from the point of impact.
Wood shake and shingle
Wood is the most vulnerable of the common roof materials to hail. Damage shows as splits and cracks running along the grain, usually near the thin edges, along with broken corners and impact marks. One honest difficulty: a hail split can look a lot like a "foot-fall" split from someone having walked on the roof, so wood is a material where an experienced eye matters (see the Natural Slate and Wood Shake page).
Low-slope membrane
On flat roofs, hail shows as circular indentations, pockmarks, and small punctures in the membrane. On modified bitumen you may see granule displacement much like an asphalt shingle. Check the flashing, the edge metal, and the sealant around vents, pipes, and rooftop-unit curbs, all of which are easy for hail to crack or displace.
A useful distinction: functional versus cosmetic
Inspectors sort hail damage into two buckets. Functional damage reduces the roof's ability to shed water or shortens its expected service life (a fractured mat, a puncture, a cracked tile). Cosmetic damage changes appearance without changing performance (a dent in a metal panel that still keeps water out). This distinction describes the condition of the roof itself and what it means for how long the roof will last. How a given policy treats each is a separate question, and one your carrier answers.
Sidebar: impact ratings you will see referenced
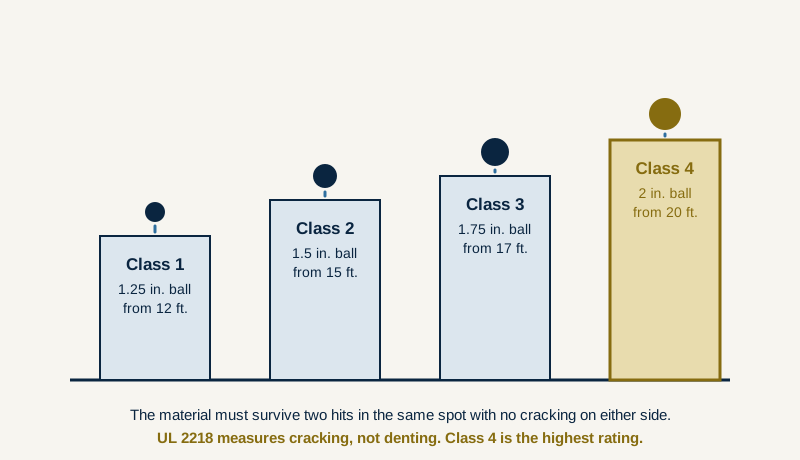
Roofing materials are graded for impact resistance under a standard called UL 2218, developed by Underwriters Laboratories with IBHS in the 1990s. A steel ball is dropped onto the material from a set height, and the material must survive two hits in the same spot with no cracking on either side. Class 4 is the top rating, a two-inch ball dropped from twenty feet.
One thing to keep straight: UL 2218 measures cracking and rupture, not denting. A Class 4 metal roof can still pick up cosmetic dents in a big storm and remain fully watertight. If your association is weighing a Class 4 upgrade as part of a replacement, see the impact-resistant (Class 4) shingles section of our Asphalt Shingles guide, which covers the cost premium, the insurance-credit question, and what the rating does not measure.
Do not forget the inside
Some of the most important evidence is in the attic and top-floor ceilings, not on the roof. Fresh water stains on rafters or on the underside of the roof deck, damp or matted insulation, and new ceiling stains all point to water that has already found a way in. These interior signs sometimes appear before anything is obvious from outside, and they are safe to check without a ladder.
What a board should document
The goal of documentation is a clear, factual record of condition, taken close to the event. Capture these:
- The storm date and, if you can, the wind direction. You can confirm that a storm actually occurred over your address, and its date, county, hail size, and estimated wind speed, using NOAA's free Storm Events Database, which is searchable by county and date. A printed record from that database is a clean, neutral way to establish that an event happened.
- Dated photos, wide and close. Wide shots that show which building and which elevation, then close-ups of each specific sign. Most phones stamp the date automatically, which is exactly what you want.
- Locations. Note the building or address, the slope or elevation (north, south, east, west), and the component (roof field, ridge, valley, flashing, gutter, siding, fence).
- Interior evidence. Photograph any attic or ceiling water signs, with the unit or common area noted.
A few guardrails. Stay OFF the roofs. Document from the ground, from windows, and with binoculars or a zoom lens, and leave roof-level inspection to a qualified professional with the right equipment. Keep the record factual: what you see, where, and when. A clean, dated record is what every conversation afterward runs on, including the one with your carrier.
When to bring in a qualified professional
Call in a qualified roofing professional after any storm that brought roughly one-inch or larger hail or wind in the neighborhood of 50 miles per hour or higher, any time you can see damage from the ground, or any time you have interior water signs. A trained inspector does the thing a board should not try to do from the parking lot: get on the roof safely, and tell fresh storm damage apart from age, sun wear, foot traffic, and installation defects. Getting that call right early keeps a small, real problem from being missed and keeps a board from chasing damage that is not storm-related.
There is a quieter piece of timing that matters more than most boards expect. A baseline inspection before storm season, documented with photos, gives your association a dated record of the roof's condition on a clear day. When a storm does come through, that baseline is the honest before-and-after that makes the whole recognition process faster and less arguable. This is the evidence-based reason to act, and it is the opposite of a countdown clock. There is no rush being manufactured here, only a record worth having before you need it.
Take the next step
If a storm has already come through, download the Post-Storm Documentation Checklist and work it building by building while the details are fresh. If you want a dated record of where your roofs stand today, before the next system rolls in, request a baseline roof inspection.
Either way, send us the storm date and the property address, and we will tell you what we would look at first, then walk the property with your board from there.
How we source this page
Recognition facts on this page are drawn from published building-science and roofing authorities and are reviewed against current sources before posting. Criteria: national standards and material behavior only, and no ranking or recommendation of local firms.
Sources and further reading
- Insurance Institute for Business and Home Safety (IBHS), wind and hail research: ibhs.org (Opens in a new tab)
- National Roofing Contractors Association (NRCA), damage assessment guidance: nrca.net (Opens in a new tab)
- UL Solutions, UL 2218 impact-resistance standard: ul.com (Opens in a new tab)
- NOAA National Centers for Environmental Information, Storm Events Database (search a storm by county and date): ncei.noaa.gov/stormevents (Opens in a new tab)
- FEMA, storm damage assessment resources and hail data: fema.gov (Opens in a new tab)
- International Association of Certified Home Inspectors (InterNACHI), roof inspection references: nachi.org (Opens in a new tab)
- Haag Engineering, origin of the roof test-square inspection method (named for reference)
- University of Minnesota Extension, related Minnesota building-science topics such as ice dams and attic ventilation: extension.umn.edu (Opens in a new tab)