A crew can install a full building's worth of brand-new shingles and siding, everything straight and tight, and the first hard rain still finds its way in at the corner where the roof meets the chimney. Not through the shingles. Through the transition. The metal that handles those transitions is called flashing, and it is where most roof and wall leaks begin.
Shingles and siding do one job well: they shed water across an open, flat plane. The trouble starts wherever that plane stops and meets something else, a wall, a chimney, a pipe, a skylight, a valley, or another material. Those transitions concentrate runoff and interrupt the downhill path, and they depend on correctly installed metal to push water back out onto the roof and into the gutter. Roofers commonly say the large majority of leaks they find start at flashing, not in the field of the shingles, and some put it as high as ninety percent.
The transitions that need flashing
Each type of flashing solves a specific joint. A board does not need to install these, but knowing the names lets you read a proposal and ask whether each one is in the scope.
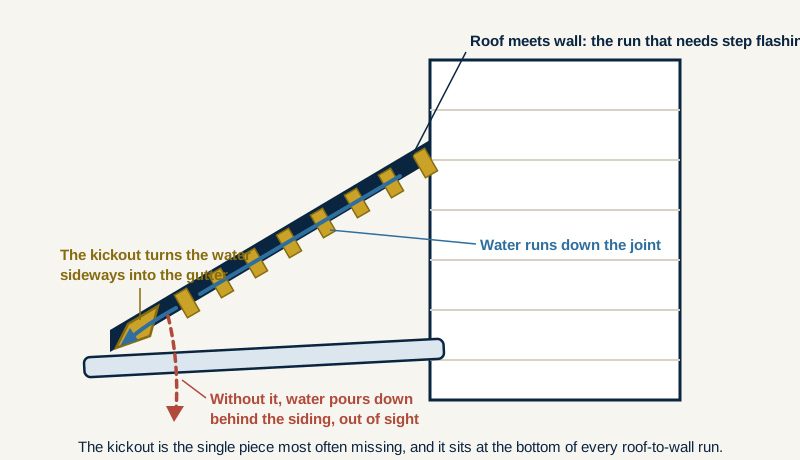
- Step flashing. Where a sloped roof meets a vertical wall (a dormer, or where a lower roof ties into a taller wall). It is a series of small L-shaped pieces, one woven into each course of shingles, at least four inches up the wall and four inches onto the roof. A single continuous strip bent into the corner instead of individual steps is a defective installation, called out by home-inspector associations and by every shingle manufacturer.
- Kickout (diverter) flashing. The single piece most often missing. It sits at the bottom of a roof-to-wall run and kicks the water sideways off the wall and into the gutter. Leave it out and the water pours straight down behind the siding, where it rots the wall and framing out of sight for years. Current code calls for a diverter at these transitions, and it is still the most common thing we find left off.
- Counter flashing. At chimneys and masonry walls, the cap that covers the top edge of the step flashing. Done right, it is set into a groove cut into the mortar joint (a reglet, or kerf). A bead of caulk smeared over the top instead of metal set into the mortar is a red flag, and it is everywhere.
- Chimney flashing. Not one piece but an assembly: an apron on the downhill face, step flashing up both sides, a cricket or saddle on the uphill side to split water around a wide chimney (recommended over about thirty inches wide), and counter flashing set into the mortar to cap it. A chimney interrupts the roof on four sides, which makes it the most demanding flashing job on most buildings and the most likely to leak if any one piece is wrong.
- Valley flashing. Where two roof planes drain into one channel, it carries more water than anywhere else on the roof. In a heavy rain it runs like a river, so a small gap here fails fast.
- Z-flashing. Named for its shape. It caps horizontal joints: above window and door trim, at the transition between two siding materials, and above belly bands. The top leg tucks up behind the WRB so water sheds over the face, not behind it. A run of caulk across a horizontal siding joint instead of Z-flashing is a wall leak waiting to happen.
- Coping and cap flashing. The metal cap on top of a parapet, a low wall, or a chimney crown that sheds water off the top. Code requires flashing under and at the ends of copings for a reason: the top of a wall is a funnel if it is left open.
- Penetration (boot) flashing. The seal around vent pipes and other roof penetrations. The rubber boot on a pipe usually cracks from sun and age in eight to twelve years, long before the metal base fails, so on an older roof the boots are often the actual leak.
- Drip edge. The metal at the eaves and rakes that carries water off the deck edge into the gutter and keeps it from wicking back under.
Why flashing fails
Flashing lives where the building moves the most. Roofs expand in summer heat and contract in winter cold, and masonry moves at a different rate than the deck, so any joint that relied on a rigid seal works loose over time. Sealant dries and cracks. Dissimilar metals corrode where they touch. Wind lifts sections that were never fastened well.
The largest single cause, though, is how it was installed in the first place: one-piece flashing where individual steps belong, laps facing the wrong way so water runs under instead of over, a missing kickout, or caulk standing in for metal. A bead of caulk is not flashing, and it never was. The fix is not more caulk. It is correct metal, lapped so water keeps moving down and out.
Every transition has to be in the scope
Here is the pattern we see on project after project. Beautiful new materials, tens of millions of dollars of them across a portfolio, installed over a missing, reused, or reversed detail. The field looks perfect. The transitions were skipped. And it will leak, because water goes to the transition first.
When an association reroofs or resides, the flashing at every transition MUST be written into the scope and priced, not left as an assumption. New shingles laid over old, tired, or wrong flashing is one of the most expensive mistakes in exterior work, because the leak hides inside the wall and the repair means opening finished surfaces to reach it. Do not let a bid quietly reuse twenty-year-old flashing under new material.
So what does this mean for your association?
Flashing is the part of the estimate to read closely, because it is the part most likely to be thin. A few questions put the transitions on the table before the work starts:
- Which transitions are being replaced with new metal, and which are being reused?
- Is step flashing individual pieces woven into each course, not one continuous bent strip?
- Is there a kickout at the bottom of every roof-to-wall intersection above a gutter?
- Is chimney counter flashing being set into the mortar, not caulked over the top?
- Is a cricket included on any chimney wider than about thirty inches?
- Are pipe boots and penetrations being replaced, not just re-caulked?
If the answers are vague, the flashing budget is probably where the low bid got low.
How to evaluate flashing scope (our methodology)
We read flashing details against published standards, not opinion: the International Residential Code (Section R703.4 for wall flashing and R903.2 for roof flashing), the corrosion-resistant metal-thickness minimums those sections reference, and the installation details published by the National Roofing Contractors Association and the shingle manufacturers. We describe what good practice requires so a board can compare bids on the same terms. This page was last reviewed in July 2026 and is refreshed when a code reference or manufacturer detail changes.
Sources and further reading
- IKO, what is roof flashing and how it works: iko.com (Opens in a new tab)
- Fine Homebuilding, window, door, and trim cap flashing, with the IRC R703.4 flashing text explained: finehomebuilding.com (Opens in a new tab)
- GreenBuildingAdvisor, Z-flashing at horizontal trim and siding transitions: greenbuildingadvisor.com (Opens in a new tab)
- Trex Seal, what Z-flashing is and where it goes: trexseal.com (Opens in a new tab)
- National Roofing Contractors Association, Professional Roofing (transitions, moisture, and details): professionalroofing.net (Opens in a new tab)
- See also our companion pages, Underlayments, Housewrap, and Leak Barriers, and Ice Dams.
A note on scope
TruPoint is an advisor, not the building official or a licensed engineer. This page explains flashing concepts so a board can ask sharper questions and write a scope that covers the transitions. Verify code specifics with your local building official and confirm details against the manufacturer's current installation instructions.
Next step
If your association has a reroof or exterior project coming up, request a transition and flashing review before the bids go out. We will walk the transitions your building actually has, note which ones tend to get skipped, and give your board a plain-language checklist to hold each bidder to, so the details that cause the leaks are priced in from the start. You can also download the Weather Barrier and Flashing Checklist for your next walk-through.